About the "Profiler" Add-On
INTRODUCTION
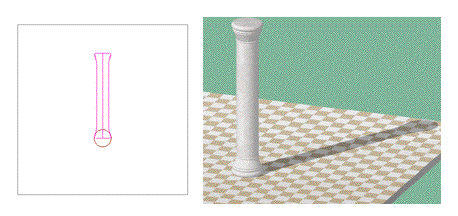
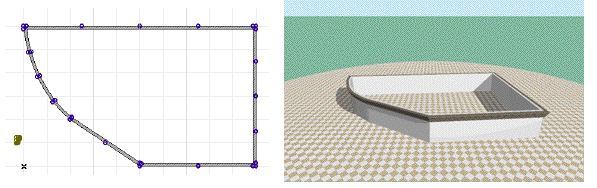
The Profiler Add-On allows you to create Object type Library Parts by extruding a profile along a straight or curved path.
HOW TO INSTALL "Profiler" ADD-ON
Start this installer and follow the instructions. The add-on will be automatically loaded the next time you start ArchiCAD.
The new "Profiler"command will appear in the "Design/Design Extras" submenu by default.
HOW TO USE "Profiler" ADD-ON
To create an object:
- In the Floor Plan window, draw the profile that you wish to extrude using any of ArchiCAD's construction and drawing tools. To create a complex extrusion, group several elements together.
- Select the profile and choose the Profiler command from the Design/ Design Extras menu.
- In the Profiler Settings dialog box that appears, choose the appropriate options:

- Choose either the Straight or the Curved geometry method using the buttons at the top of the dialog box.
- Set the height of the Anchor Point.
- Choose an Anchor Point or check the "Click on Plan to enter" checkbox to define it graphically.
- Set the attributes (contour Line Type, Pen Color, Fill Pattern, Material) of the new object and assign it to a Layer.
- Click OK.
- If you chose Click on Plan to enter, you will now need to click somewhere on the Floor Plan to indicate the Anchor Point.
- Define the Path the same way you would draw a Curved wall or a Polywall.
- Save the object.
To create an object with a pre-drawn path or axis:
- Draw both the profile and the Path/Axis, and select them as two separate groups.
- Choose the Profiler command in the Design/ Design Extras menu. The Profiler Settings dialog box appears (see above).
- Make sure the correct geometry method is set (a straight path could be an axis and vice versa).
- Set the height of the Anchor Point (note that if the profile is revolved around an axis, the height will refer to the lowest point on the axis).
- Set the attributes and choose a Layer for the object.
- Click OK.
-
- With the Straight geometry method, you need to click the Anchor Point. This needs to be a point of the profile - it can also be a Hotspot outside of the Profile, but grouped to it.
- With the Curved geometry method, you will need to click twice: first, to define the position of the lowest point on the axis, then to indicate the direction in which the object should be tilted. (If the axis is not tilted, you only need to click once.)
- Save the object.
NOTES
- The profile should be drawn with the top up, not rotated.
- An axis drawn parallel to the y-axis will be considered vertical; if the axis is tilted, the object will be placed tilted.
- When drawing the path, the direction of the profile depends on the direction in which you draw the line. (This can be changed later in the Object Settings dialog box.)
Disclaimer:
The software is provided to you "AS IS" and you acknowledge that it may contain errors. Graphisoft disclaims any warranty or liability obligations of any kind.
©2011 Graphisoft.
All rights reserved.
ArchiCAD is a registered trademark of Graphisoft.
Other product and company names are trademarks of the respective holders.